We have to create the login and registration form in the Html document many times to show forms on a web page. So, this page will describe how to create both the forms in the Html documents using various tags.
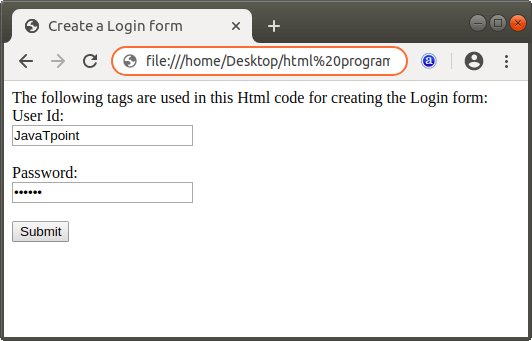
Login Form
If we want to create a login form in the Html document to show the form on the web page then we have to follow the steps or use the following tags. Using these tags or steps, we can easily create a form.
Step 1: Firstly, we have to type the Html code in any text editor or open the existing Html file in the text editor in which we want to create the login form.
<!Doctype Html>
<Html>
<Head>
<Title>
Create a Login form
</Title>
</Head>
<Body>
The following tags are used in this Html code for creating the Login form:
</Body>
</Html>
Step 2: Now, we have to place the cursor at that point where we want to create a form between the starting and closing of <body> tag in the Html document. And, then we have to type the tag whose name is <form>. It is the first tag which is used for creating an Html form.
<Body>
The following tags are used in this Html code for creating the Login form:
<form>


</form>
</Body>
Step 3: Now, we have to use the <label> tag, which defines the name for elements. So, we have to type the second tag for displaying the User Id. After typing the name, we have to close the </label> tag.
<label>User Id: </label> Step 4: Now, we have to use the <input> tag, which allows users to insert the characters into the box. So, we have to type this tag with its attribute for inserting the User-id. There is no need to close the input tag because it is unpair tag.
<input type="text"> Step 5: Again, we have to type the <label> tag for displaying the label as password. And, then we have to type the password by using the <input> tag which is shown in the following block:
<label>Password:</label>
<input type="password">
Step 6: And after then, we have to give the submit value in type attribute for submitting the form.
<input type="submit" value="Submit"> Step 6: And, at last, we have to save the Html file and then run the file and then we will see the login form on the web page in the browser.
<!Doctype Html>
<Html>
<Head>
<Title>
Create a Login form
</Title>
</Head>
<Body>
The following tags are used in this Html code for creating the Login form:
<form>
<label>User Id: </label> <br>
<input type="text"> <br> <br>
<label>Password:</label> <br>
<input type="password">  <br> <br>
<input type="submit" value="Submit">
</form>
</Body>
</Html>
The output of above Html code is shown in the following screenshot:
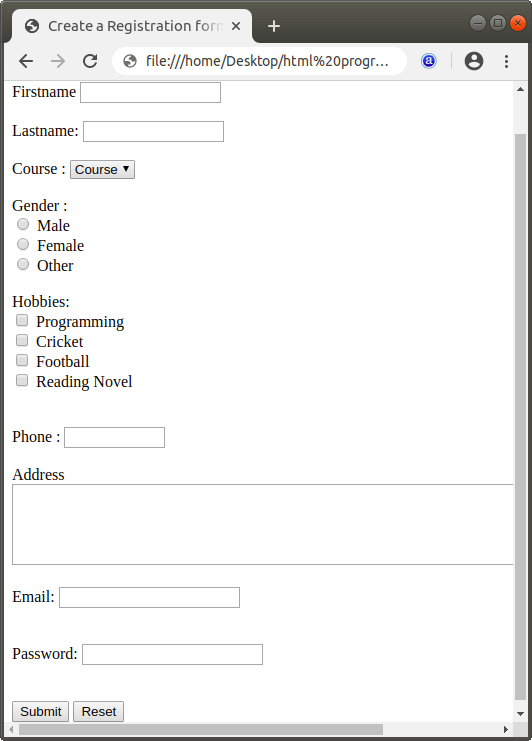
Registration Form
If we want to create a registration form in the Html document, then we have to follow the steps or use the following tags. Using these tags or steps, we can easily create a form.
Step 1: Firstly, we have to type the Html code in any text editor or open the existing Html file in the text editor in which we want to create the registration form.
<!Doctype Html>
<Html>
<Head>
<Title>
Create a Registration form
</Title>
</Head>
<Body>
The following tags are used in this Html code for creating the Registration form:
</Body>
</Html>
Step 2: Now, we have to place the cursor at that point where we want to create a form between the starting and closing of <body> tag in the Html document.
And, then we have to type the tag whose name is <form>. It is the first tag which is used for creating an Html form.
Step 3: Label: Now, we have to define the label, which is used to denote the name for which the element is created.
Step 4: Text and Password Field: we can also easily create the text and password fields using input tag with the different value of type attribute.
Step 5: Radio Button: We can also create the radio button for selecting one option from the given list. To create the radio button, we have to give the “radio” value in the type attribute of the input tag.
Step 6: Checkbox: We can also create the checkboxes for selecting one or more option from the given list. To create the checkbox in the form, we have to give the “checkbox” value in the type attribute.
<label>
Hobbies:
</label>
<br>
<input type="checkbox" name="Programming"> Programming <br>
<input type="checkbox" name="Cricket"> Cricket <br>
<input type="checkbox" name="Football"> Football  <br>
<input type="checkbox" name="reading Novel"> Reading Novel
Step 7: Drop-down Menu: If we want to create the drop-down menu for selecting an option. So, to create it, we have to type the option element within the select element.
<label>
Course :
</label>
<select>
<option value="Course">Course</option>
<option value="BCA">BCA</option>
<option value="BBA">BBA</option>
<option value="B.Tech">B.Tech</option>
<option value="MBA">MBA</option>
<option value="MCA">MCA</option>
<option value="M.Tech">M.Tech</option>
</select>
Step 8: Text area: If we want to enter one or more line of text in the box, then we have to use the <textarea> tag in the <form> tag.
<textarea cols="80" rows="5" value="address">
</textarea>
Step 9: File Select box: If we want to attach a local file with the form data then we have to give the file value in the “type” attribute of <input> tag.
Step 10: Submit button: This button is used at the end of the form just before the closing of <form> tag. It is used for submitting the form in the database.
<input type="submit" value="Submit">Step 11: Reset button: This button is used to reset all the form controls to their default values. To create the reset button, we have to give the reset value in the type attribute of <input> tag.
<input type="reset" value="Reset"> Step 12: And, after all the tags we have to close the </form> tag and then we have to save the Html file and then run the file in the Browser.
<!Doctype Html>
<Html>
<Head>
<Title>
Create a Registration form
</Title>
</Head>
<Body>
The following tags are used in this Html code for creating the Registration form:
<br>
<form>
<label> Firstname </label>
<input type="text" name="firstname" size="15"/> <br> <br>
<label> Lastname: </label>
<input type="text" name="lastname" size="15"/> <br> <br>
<label>
Course :
</label>
<select>
<option value="Course">Course</option>
<option value="BCA">BCA</option>
<option value="BBA">BBA</option>
<option value="B.Tech">B.Tech</option>
<option value="MBA">MBA</option>
<option value="MCA">MCA</option>
<option value="M.Tech">M.Tech</option>
</select>
<br>
<br>
<label>
Gender :
</label><br>
<input type="radio" name="gender"/> Male <br>
<input type="radio" name="gender"/> Female <br>
<input type="radio" name="gender"/> Other
<br>
<br>
<label>
Hobbies:
</label>
<br>
<input type="checkbox" name="Programming"> Programming <br>
<input type="checkbox" name="Cricket"> Cricket <br>
<input type="checkbox" name="Football"> Football  <br>
<input type="checkbox" name="reading Novel"> Reading Novel  <br>
<br>
<br>
<label>
Phone :
</label>
<input type="text" name="phone" size="10"> <br> <br>
Address
<br>
<textarea cols="80" rows="5" value="address">
</textarea>
<br> <br>
Email:
<input type="email" id="email" name="email"> <br>
<br> <br>
Password:
<input type="Password" id="pass" name="pass"> <br>
<br> <br>
<input type="submit" value="Submit">
<input type="reset" value="Reset">
</form>
</Body>
</Html>
The output of above Html code is shown in the following screenshot: