If we want to add padding in the Html document using the Internal CSS, then we have to follow the steps which are given below. Using these simple steps, we can easily add the padding.
Step 1: Firstly, we have to type the Html code in any text editor or open the existing Html file in the text editor in which we want add the padding.
<!Doctype Html>
<Html>
<Head>
<Title>
Add the Padding in Html
</Title>
</Head>
<Body>
Hello User!...
You are at JavaTpoint Site...
The text on which we want to add padding.
</Body>
</Html>
Step 2: Now, we have to place the cursor in the head tag just after the title tag of the Html document and then define the <style> tag as shown in the following block.
<Head>
<Title>
Add the Padding in Html
</Title>
<style>
</style>
</Head>
Step 3: Now, we have to define the property of padding in that id selector which is specified just before the text on which we want to add padding.
Following are the five different properties from which we can apply the padding on each side:
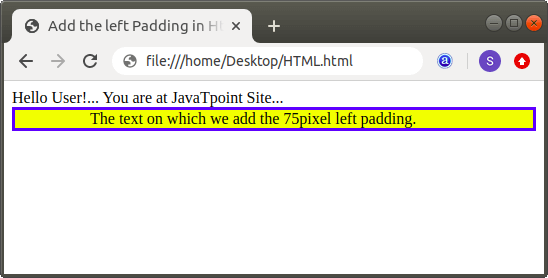
i. Padding-left:
If we want to apply only left padding to an element, then we have to use only padding-left property in the id selector. And, then we have to set only one value to the property as shown in the following example:
<!Doctype Html>
<Html>
<Head>
<Title>
Add the left Padding in Html
</Title>
<style>
div {
  border: 3px solid blue;
  padding-left: 75px;
  background-color: yellow;
}
</style>
</Head>
<Body>
Hello User!...
You are at JavaTpoint Site...
<div>
The text on which we add the 75pixel left padding.
</div>
</Body>
</Html>
The output of above code which uses the padding-left property is shown in the following screenshot:
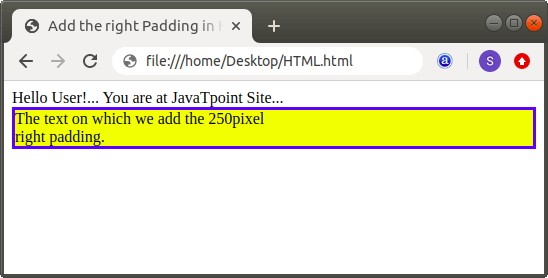
ii. Padding-right:
If we want to apply only right padding to an element, then we have to use only padding-right property in the id selector. And, then we have to set only one value to the property as shown in the following example:
<!Doctype Html>
<Html>
<Head>
<Title>
Add the right Padding in Html
</Title>
<style>
div {
  border: 3px solid blue;
  padding-right: 250px;
  background-color: yellow;
}
</style>
</Head>
<Body>
Hello User!...
You are at JavaTpoint Site...
<div>
The text on which we add the 250pixel right padding.
</div>
</Body>
</Html>
The output of above code which uses the padding-right property is shown in the following screenshot:
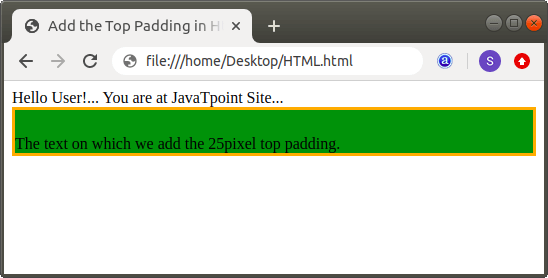
iii. Padding Top:
If we want to apply only top padding to an element, then we have to use only padding-top property in the id selector. And, then we have to set only one value to the property as shown in the following example:
<!Doctype Html>
<Html>
<Head>
<Title>
Add the Top Padding in Html
</Title>
<style>
div {
  border: 3px solid orange;
  padding-top: 25px;
  background-color: green;
}
</style>
</Head>
<Body>
Hello User!...
You are at JavaTpoint Site...
<div>
The text on which we add the 25pixel top padding.
</div>
</Body>
</Html>
The output of above code which uses the padding-top property is shown in the following screenshot:
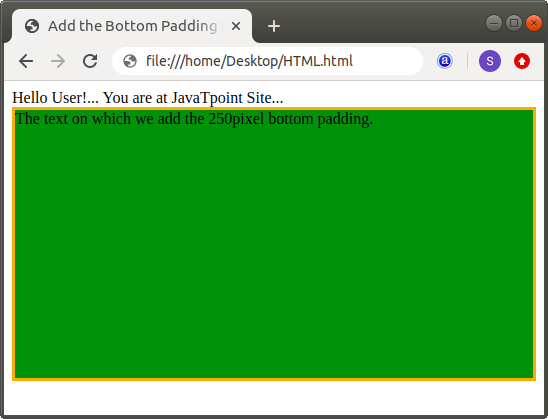
iv. Padding Bottom:
If we want to apply only bottom padding to an element, then we have to use only padding-bottom property in the id selector. And, then we have to set only one value to the property as shown in the following example:
<!Doctype Html>
<Html>
<Head>
<Title>
Add the Bottom Padding in Html
</Title>
<style>
div {
  border: 3px solid orange;
  padding-bottom: 250px;
  background-color: green;
}
</style>
</Head>
<Body>
Hello User!...
You are at JavaTpoint Site...
<div>
The text on which we add the 250pixel bottom padding.
</div>
</Body>
</Html>
The output of above code which uses the padding-bottom property is shown in the following screenshot:
v. Padding:
If we want to apply the different padding to all the four sides (top, bottom, left, right), then we have to specify the four values in the padding property.
padding: 10px 50px 75px 200px; If we specify the two values, then the Html editor applies the first padding to the top and bottom and second padding to the left and right.
padding: 100px 50px; If we specify only value in the padding attribute, then the Html editor apply the same padding to all the four sides.
padding: 100px; Examples of Padding Property:
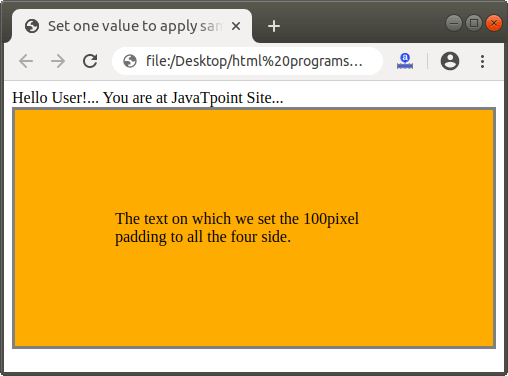
Example 1: The following example uses one value in the padding property to set the same padding to all four sides.
<!Doctype Html>
<Html>
<Head>
<Title>
Set one value to apply same padding
</Title>
<style>
div {
  border: 3px solid gray;
  padding: 100px;
  background-color: orange;
}
</style>
</Head>
<Body>
Hello User!...
You are at JavaTpoint Site...
<div>
The text on which we set the 100pixel padding to all the four side.
</div>
</Body>
</Html>
The output of example 1 is shown in the following screenshot:
Example 2: The following example uses two values in the padding property to set the same padding to the opposite sides.
<!Doctype Html>
<Html>
<Head>
<Title>
Specify two value to apply same padding on opposite sides
</Title>
<style>
div {
  border: 3px solid black;
  padding: 100px 50px;
  background-color: gray;
}
</style>
</Head>
<Body>
Hello User!...
You are at JavaTpoint Site...
<div>
This is a text on which we set the 100 pixel padding to top and bottom and 50 pixels to left and right side.
</div>
</Body>
</Html>
The output of example 2 is shown in the following screenshot:

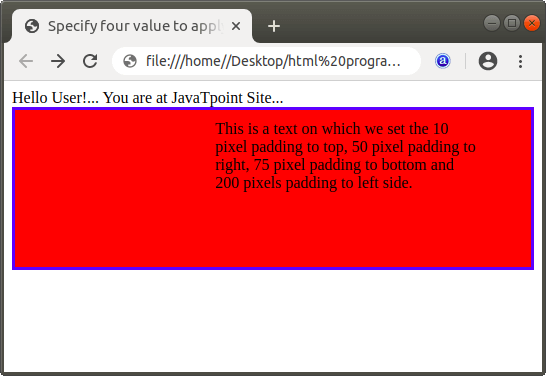
Example 3: The following example uses four values in the padding property to set the different padding to all the four sides.
<!Doctype Html>
<Html>
<Head>
<Title>
Specify four value to apply different padding on opposite sides
</Title>
<style>
div {
  border: 3px solid blue;
  padding: 10px 50px 75px 200px;
  background-color: red;
}
</style>
</Head>
<Body>
Hello User!...
You are at JavaTpoint Site...
<div>
This is a text on which we set the 10 pixel padding to top, 50 pixel padding to right, 75 pixel padding to bottom and 200 pixels padding to left side.
</div>
</Body>
</Html>
The output of example 3 is shown in the following screenshot: